Best Yamaha Floorstanding Speakers

31 October, 2022 by Admin

If you are a fan of 3-way speakers, you will love Yamaha. It manufactures speakers at different price ranges. If you want a budget-friendly floorstanding speaker, you can choose the NS-F210BL model. Floorstanding speakers are a powerful addition in your music system. You have the option to pair it with a subwoofer or create a home theater system as the connection will be made via a receiver.

Choose the receiver or amp matching the power and impedance of the speakers. if you have space in your room, choose floorstanding speakers instead of bookshelf speakers. Based on the receiver’s connections, you can connect TV, PC, laptop, etc. Choose a speaker with a higher sensitivity if you want them easy to drive.

Yamaha floorstanding speakers excel just like their receivers. Sound quality varies from model to model but they beam with clarity and accuracy. Music and movies become lifelike. Choose speaker based on your room size.

Top 4 Yamaha Floorstanding Speakers:

This section lists some of the best Yamaha floorstanding speakers.

Yamaha NS-F210BL Review:

Basic specs:

  • Drivers: 7/8" balanced dome tweeter, 2 3-1/8" cone woofer
  • Frequency response: 50 Hz-45 kHz
  • Sensitivity: 86dB
  • Input power max: 120W
  • Impedance: 6 ohms

4.3 Mixed Usages
4.3 Dialogue & Vocal Accuracy:
4.4 Treble Accuracy:
4.3 Bass Accuracy:
4.3 Imaging & Soundstage:
4.3 Dynamic Range:

Yamaha NS-F210 floorstanding speaker delivers rich and dynamic sound. It produces engaging sound while playing music and movies. It is a fast-sounding speaker that blends in well with a matching subwoofer. The result is dramatic improvement in the sound quality. It produces a balanced sound and sounds quite full.

Our Verdict

Yamaha NS-F210 is a set of compact floorstanding speakers. They have good built quality with slim profile. They are great for music but for movies, a center channel and a subwoofer will be a good choice. Voices are intelligible and the speakers can get loud enough for mid-sized rooms. Setup is simple and if you receiver has bass and treble levels, you can also tweak the sound.

PROS
  • Well built
  • Small footprint with minimalist design
  • Affordable
  • Great value for money
  • Clear mids
CONS
  • Slightly boomy bass
Where to Buy

Specification

GENERAL:

Speaker Type Floor standing speaker
Number Of Channels 2.0 way speaker
Amplification Type Passive Speaker (External Amp)
Power Source AC Powered

DRIVERS

Drive Unit 2x2
Tweeter Type balanced dome
Tweeter Size (inches) 0.875"
Midrange Size (inches) N/A
Midrange Type N/A
Woofer Size (inches) 3.125"
Woofer Type cone
Other

Specs

Power Range 120 W / 40 W
Sensitivity 86 dB
Impedance 6 ohms
Frequency Range 50 Hz-45 kHz
Crossover Frequencies 8 kHz

CONNECTIVITY:

Speaker Wire Input: Yes
Speaker Level Input N/A
Line Level Input N/A
Digital Input (Optical) N/A
Digital Input (Coaxial) N/A
RCA Input N/A
3.5mm Stereo Analog Input N/A
Aux Input
Bi-amp Input: N/A
HDMI Input N/A
USB Port N/A
Subwoofer Output N/A

Wireless Features

Bluetooth N/A
Wi-Fi N/A
Other

Connector:

Connector Type binding post
Compatible Connector Types bare speaker wire, pins, or spades
Speaker Wire Compatibility standard speaker wire

Audio Quality ( Tested )

Bass Accuracy: Tight and clear bass
Dialogue & Vocal Accuracy: Loud vocals
Treble Accuracy Decent highs
Imaging & Soundstage: Focused imaging and wide soundstage
Dynamic Range: Good dynamic range
Power Handling: Easy to drive
Frequency Response: Broad frequency response
Transient Response: Quick transient response

Build Material

Enclosure ported
Finish MDF
Color White, black, brown, piano black

Size & Weight

Height (inches) 41.3"
Width (inches) 9.3"
Depth (inches) 9.3"
Weight (pounds) 16.1 lbs
Recommended Stand Height (inches) none

Control

Handheld Remote N/A
Control by app N/A
Amazon Alexa N/A
Google Assistant N/A

IN THE BOX

Accessories: Yamaha NS-F210 speakers, 4m Speaker Cable
User manual: Yes

The floorstanding speakers measure around 9-5/16" x 41-5/16" x 9-5/16" and has a sleek profile. They show a balanced sound profile and has well-built chassis. Pair an amplifier with the speakers. With high sensitivity, they are easy to drive. Place them in mid-sized rooms and they will shine. It is suggested to place the speakers 20cm away from TV sets.

The speakers produce crisp and clear sound. Once we started listening to music tracks, we noticed the speakers can get loud enough to fill small to medium sized rooms. While the high frequencies are attacking, the mids are flat and bass is present. With a subwoofer, the overall sound performance will improve.

Use them as front L/R speaker to create a 5.1 theater system. This affordable Yamaha floorstanding speakers produce lively sound as you play music or movies. You will be impressed by the midrange clarity and powerful soundstage. Movies are enjoyable with powerful soundtracks. If you choose to install a 5.1, you will have theater-like experience. This model is one of the best Yamaha floorstanding speaker under $200.

Best for:

It is best for users who prefer small footprint tower speaker at an affordable price.

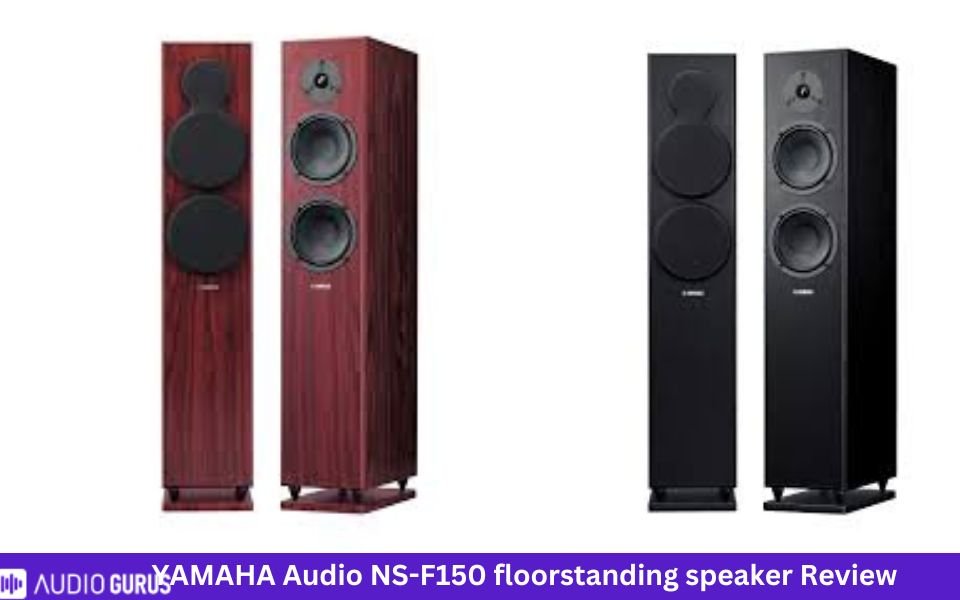
Yamaha Audio NS-F150 Review:

Basic specs:

  • Drivers: 1” soft dome tweeter, 2 6.5” woofer
  • Frequency response: 37 Hz–30 kHz
  • Max input power: 180W
  • Sensitivity: 88dB
  • Impedance: 6 ohms

4.25 Mixed Usages
4.2 Dialogue & Vocal Accuracy:
4.3 Treble Accuracy:
4.3 Bass Accuracy:
4.2 Imaging & Soundstage:
4.2 Dynamic Range:
Specification

GENERAL:

Speaker Type Floor standing speaker
Number Of Channels 2.0 way speaker
Amplification Type Passive Speaker (External Amp)
Power Source AC Powered

DRIVERS

Drive Unit 2x2
Tweeter Type Soft dome
Tweeter Size (inches) 1"
Midrange Size (inches) N/A
Midrange Type N/A
Woofer Size (inches) 6.5"
Woofer Type cone
Other

Specs

Power Range 50/180 W
Sensitivity 88 dB
Impedance 6 Ohms
Frequency Range 37 Hz–30 kHz
Crossover Frequencies Not specified

CONNECTIVITY:

Speaker Wire Input: Yes
Speaker Level Input N/A
Line Level Input N/A
Digital Input (Optical) N/A
Digital Input (Coaxial) N/A
RCA Input N/A
3.5mm Stereo Analog Input N/A
Aux Input N/A
Bi-amp Input: N/A
HDMI Input N/A
USB Port N/A
Subwoofer Output N/A

Wireless Features

Bluetooth N/A
Wi-Fi N/A
Other

Connector:

Connector Type gold-plated screw terminals
Compatible Connector Types Bare wire, banana plug
Speaker Wire Compatibility Standard speaker wire

Audio Quality ( Tested )

Bass Accuracy: Clean and tight bass but not room shaking
Dialogue & Vocal Accuracy: clearer voices
Treble Accuracy Extended and detailed highs
Imaging & Soundstage: Powerful imaging and wide soundstage
Dynamic Range: Decent dynamic range
Power Handling: Not very difficult to drive
Frequency Response: Broad frequency response
Transient Response: Good transient response

Build Material

Enclosure Ported
Finish MDF
Color Black, Rosewood

Size & Weight

Height (inches) 37.375”
Width (inches) 7.875”
Depth (inches) 14.25”
Weight (pounds) 20.9 lbs
Recommended Stand Height (inches) none

Control

Handheld Remote N/A
Control by app N/A
Amazon Alexa N/A
Google Assistant N/A

Rating System

Bass Accuracy: 4.28
Dialogue & Vocal Accuracy: 4.2
Treble Accuracy: 4.32
Imaging & Soundstage: 4.2
Dynamic Range: 4.24

IN THE BOX

Accessories: 1 pair of Yamaha NS-F150 speakers, 4m speaker cable
User manual: Yes

Yamaha NS-F150 are a good and modern looking floorstanding speakers. Build quality is strong and covered by grilles. These great sounding speakers have rich and detailed sound with punchier bass. If you are picky, pair a subwoofer for better low ends. Once paired with a receiver, you can listen to CDS, movies or music. No matter the type of content, the speakers can handle them well.

The speakers produce crisp, clear, and well-balanced sound. Include center channel, rear speakers to create a home theater. You can pair it with Yamaha rx-a780 amp or Yamaha R-S300BL stereo receiver. You can listen to the speakers for long hours as they don’t cause ear fatigue nor produce harsh sound. It is designed to perform well when HD movies or music is given as input.  

On the rear side you will see screw terminals that are gold plated. This ensures the highest signal transmission. Connect it to your TV, laptop, computer or even turntables and enjoy powerful sound.

Best for:

If you want a powerful set of floorstanding speakers, then NS-F150 is best for you.

  1. Yamaha NS-555

Basic specs:

  • Drivers: 1” aluminum dome tweeter, 5” cone, 2 6.5” woofer
  • Input power: 250W
  • Sensitivity: 88dB
  • Impedance: 6 ohms

Yamaha NS-555 is a three-way floorstanding speaker. They measure 8-3/4" x 38-9/16" x 13-9/16". Midrange and tweeters use Yamaha waveguide horns so that the imaging is improved. Since most of our rooms aren’t well designed for theater systems, reflected sound doesn’t deliver the best results. Waveguide reduces reflected sound and increases directly emitted sound.

Place them on the given speaker stands so they are stable and doesn’t show any coloration. Elliptical cabinet minimizes diffraction. They are covered by grille and enclosure material is of high quality. The speakers are magnetically shielded so you can place them near TVs or video monitors. Like other Yamaha floorstanding models, you can create home theater with them. You are not bound to pair it with Yamaha amp or receiver, you can choose other models like Pioneer.

The speakers produce natural, crisp and the instruments are well-represented. Compared to NS-F210 speakers, this model will deliver solid and powerful performance. Even audiophiles who don’t want to scrutinize can enjoy these speakers. They are comparable to more expensive speakers.

Best for:

This model is best for users who prefer mid-range Yamaha speakers that excel in audio performance.


  1. Yamaha NS-F901PN

Basic specs:

  • Frequency response: 32 Hz-50 kHz
  • Drivers: 2 6-1/2” woofer, 5” midrange,   1” tweeter
  • Sensitivity: 89dB
  • Input power: 200W

The speakers

It is designed to have non-parallel surface so that standing waves are reduced. The speakers are tall, dark, and quite modern. Crossover network section is built with high-end materials. They produce adequate amount of bass, treble region is well-represented as well. Music and movies are enjoyable through these speakers.

Low ends are clear and deep. Treble region is clear and accurate. Cabinet and drivers are designed with such material so that the speakers produce impactful sound. The speakers are tonally accurate and delivers balanced sound.

Best for:

If cost isn’t an issue, you can choose this Yamaha floorstanding speaker to bring powerful sound in your house.

Best alternative:

Have a look at the closest competitors of Yamaha floorstanding speakers.

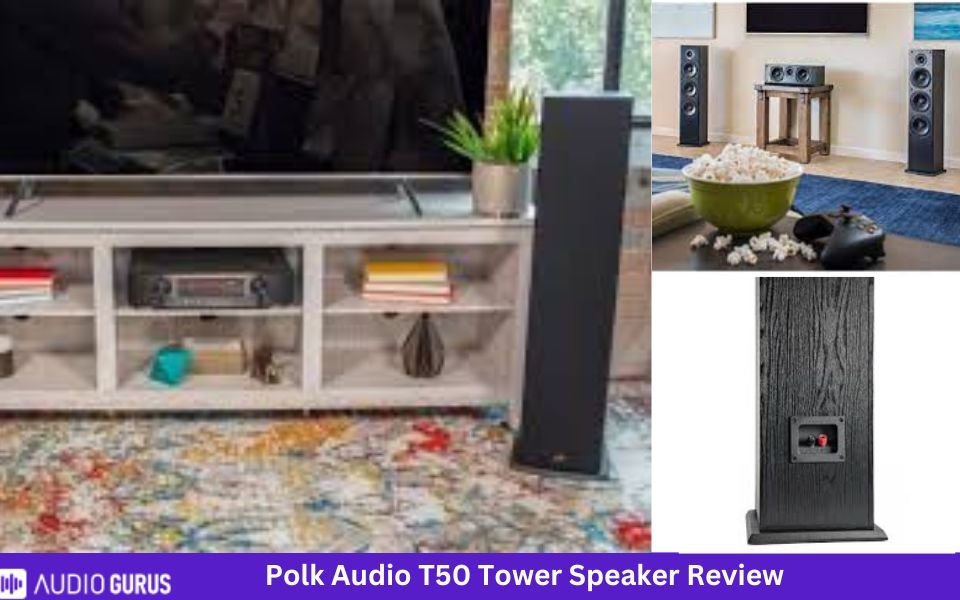
  • Polk T50

Basic specs:

  • Drivers: 1 1" Tweeter, 2 6.5" Bass Radiator, 1 6.5" Mid/Woofer
  • Frequency response: 38 Hz → 24,000 Hz
  • Impedance: 8 ohms → 6 ohms
  • Peak power handling: 150W
  • Sensitivity: 90dB

4.44 Mixed Usages
4.5 Dialogue & Vocal Accuracy:
4.5 Treble Accuracy:
4.4 Bass Accuracy:
4.4 Imaging & Soundstage:
4.4 Dynamic Range:
Specification

GENERAL:

Speaker Type Floor standing speaker
Number Of Channels 2.0 way speaker
Amplification Type Passive Speaker (External Amp)
Power Source AC Powered

DRIVERS

Drive Unit 2x2
Tweeter Type Wave Guide Tweeter
Tweeter Size (inches) 1
Midrange Size (inches) N/A
Midrange Type N/A
Woofer Size (inches) 6.5
Woofer Type extended throw composite
Other

Specs

Power Range 20 - 100
Sensitivity 6 ohms
Impedance 90 dB
Frequency Range 40Hz-20 kHz
Crossover Frequencies Not specified

CONNECTIVITY:

Speaker Wire Input: Yes
Speaker Level Input N/A
Line Level Input N/A
Digital Input (Optical) N/A
Digital Input (Coaxial) N/A
RCA Input N/A
3.5mm Stereo Analog Input N/A
Aux Input N/A
Bi-amp Input: N/A
HDMI Input N/A
USB Port N/A
Subwoofer Output N/A

Wireless Features

Bluetooth N/A
Wi-Fi N/A
Other

Connector:

Connector Type 5-way binding posts
Compatible Connector Types banana plugs, spades, pins, bare-wire
Speaker Wire Compatibility standard speaker wire

Audio Quality ( Tested )

Bass Accuracy: Tight and clear bass but not room shaking
Dialogue & Vocal Accuracy: Crisp and clear vocals
Treble Accuracy Decent highs
Imaging & Soundstage: Great imaging and soundstage
Dynamic Range: Great dynamic range
Power Handling: They are easy to drive so a less powerful amplifier will work as well.
Frequency Response: Wide frequency response
Transient Response: Good transient response

Build Material

Enclosure Bass Reflex
Finish MDF
Color Black

Size & Weight

Height (inches) 36.25
Width (inches) 9.25
Depth (inches) 10.25
Weight (pounds) 24.8 lbs
Recommended Stand Height (inches) none

Control

Handheld Remote N/A
Control by app N/A
Amazon Alexa N/A
Google Assistant N/A

Rating System

Bass Accuracy: 4.4
Dialogue & Vocal Accuracy: 4.46
Treble Accuracy: 4.52
Imaging & Soundstage: 4.41
Dynamic Range: 4.4

IN THE BOX

Accessories: 1 Tower Speaker, 1 Grille, Warranty Registration Card
User manual: Yes

Polk uses Dynamic Balance Technology to improve the speaker performance. It supports Dolby and DTS so movie watching will be engaging. They are designed to deliver broader soundstage that is room-filling. It is made of MDF, and wood vinyl finish gives a classy look. With a dimension of 36.5"x9.25"x8.75", the speakers aren’t too large. They are one of the best affordable floorstanding speakers.

Pair other speakers from Polk to create a 5.1 home theater system. It produces clear and bright sound. It has accurate tonal characteristics and delivers rich sound. We loved this system while watching movies. We felt the same as we switched to music. The recommended amp power is 20-100W so choose an amp by matching the power and impedance.

Out of the box accuracy is pretty good. It sounded smooth and clear with excellent dynamics. The speakers can get quite loud, and you can listen to them for long period of time. They sound bigger and better than its price. It is far better than other high-priced speakers. include a subwoofer if you are sensitive about low ends. Connect it to TV, PC or any other audio source as per your receiver.

Best for:

Polk T50 are ideal for users who want floorstanding speakers to fit into their tight spaces. This pair is one of the best sounding floorstanding speakers.

  • MartinLogan Motion 60XT

Basic specs

  • Frequency response: 35–25,000 Hz ±3dB
  • Sensitivity: 94dB
  • Impedance: 4 ohms
  • Drivers: 1.25" × 2.4" HF, 6.5” mid frequency driver, 2 8” LF

The speakers can get quite loud and reveals accurate midrange with punchier low ends. Driver materials are of top quality. Tweeters produce clean and clear treble region. It sits on spikes to improve stability and the drivers are protected by perforated grille. Martin Logan takes speakers seriously. A combination of innovative engineering and advanced technologies ensure the speaker is of high quality.

The Motion 60XT produces good soundstage with minimum distortion. Use this speaker for movies or music. It can handle classical and jazz contents easily. With high sensitivity, the speakers are easy to drive. Woofers are located in such a way that the resonance will be reduced. Internal bracing and isolation are excellent.

Allow the speakers to go through break-in period and hear the sound. The speakers produce an open sound so that any type of content is enjoyable. To further improve the sound, you can always add a subwoofer. Recommended amp power for this pair is 20-400W. They aren’t cheap and that is revealed by the build quality and performance.

Best for:

 This speaker model is best for users who want the best performance along with good looks.

Parting words:

Some of the best Yamaha floorstanding speaker are NS-F901PN and NS-F150. If you prefer compact floorstanding speakers check the NS-F210BL model. You can use the floorstanding speakers as stereo or, create a complete theater system. You will find speakers at different price range and size. Driver size, sensitivity and frequency response varies as well.

Make sure you have enough space in your room to place the speakers. If you want to look into other brands, we suggest checking Polk or Martin Logan.

FAQ

Which is better bookshelf speaker or floorstanding speaker?

Both bookshelf and floorstanding speakers are best based on the scenario. If you have tight space or want small speakers with best sound, bookshelf speaker will suit you. Floorstanding speakers are larger than bookshelf speakers so they will produce bigger and better sound. This is because driver size and cabinet size affect the sound quality.

Are floorstanding speakers good for movies?

You can use Floorstanding speakers for both music and movies.

More Articles


How to mount a projector on a vaulted ceiling
The number of projectors sold went up by 12.9%, from 184 million almost to 210 million by 2020. After you decide to make a home theater and choose the projector you want to use, the next concern is how to mount it. Trying to figure out how to hang a projector from a vaulted ceiling? You just need to make a few adjustments if you know how to. If you don't, you risk damaging your projector or ceiling if you go through the process of trial and error. Don't freak out. Let us worry about it. If you have a vaulted ceiling, we'll explain you the best methods for hanging a projector from it. So, what are you waiting for? Let's get this show on the road! Steps For Mounting A Vaulted Ceiling Let's talk more about the different steps of mounting to make sure you know everything you need to know to install your mount correctly and safely. Deciding on Screen Placement Before we even get to that, we need to figure out where your projector should go. Why? If it's not in the right place, the pictures won't fit on the wall/screen. In turn, this will hurt the quality of the display. Calculate your projector’s throw distance. This is the distance from your screen to the lens of your projector. Using your projector's throw ratio, which is either a specific number or even a range of numbers (for projectors with optical zoom), you can figure out how far you can throw it. In order to figure out how far your projector should be from your screen, just use the following formula: To calculate the throw distance, multiply the throw ratio by the screen's width. Any unit of measurement may be used with this formula: inches, centimeters, feet. The throw ratio is from 1.4:1 to 2.8:1, so you may place your projector anywhere between 355.6 and 711.2 cm (11.67 to 23.33 ft) from the screen when you have a 100-inch screen. This is how the math goes: 1.4 multiplied by 100 equals 140 inches. Switching the formula is also an option. If you'd rather choose a screen size based on the location where your projector will be, use this formula: Sling range divided by Sling Ratio equals screen size. This means that for 16 feet distant from the screen, you need a projector with a throw ratio of between 1.4:1 and 2.8:1. Divide 16 feet (192 inches) by the lower end of the ratio, which equals 11.43 feet in screen size, to come up with the lower end ratio (1.4:1) (137.16 in.). With a throw ratio of up to 2.8:1, a screen size of 5.71 (68.52 in.) to 11.43 ft. is possible. Determine the best throw distance for your projector The best place to put a projector in a room may be determined after you know the throw distance range. Keep in mind the following considerations while evaluating: Depending on how loud or heavy your projector is, you will not want it dangling directly over your head whether you're sitting down or watching from a distance. Your projector is likely to have two cables: one for HDMI and one for power. The distance between your projector and your receiver will determine whether you can plug in your projector. When it comes to the picture quality, you'll want to experiment with various throw distances before deciding on a final location for the projector. While a projector placed closer to the screen will produce a brighter picture, one placed further away from the screen will provide a more contrasted and sharper image. Find out your projector’s vertical offset The best place to put a projector in a room may be determined after you know the throw distance range. Keep in mind the following considerations while evaluating: Depending on how loud or heavy your projector is, you will not want it dangling directly over your head whether you're sitting down or watching from a distance. Your projector is likely to have two cables: one for HDMI and one for power. The distance between your projector and your receiver will determine whether or not you can plug in your projector. When it comes to the picture quality, you'll want to experiment with various throw distances before deciding on a final location for the projector. While a projector placed closer to the screen will produce a brighter picture, one placed further away from the screen will provide a more contrasted and sharper image. Calculate the vertical placement of your projector. The projector's vertical offset determines how high or low the picture will be projected to achieve the desired screen height. You'll find the percentage in your projector's user guide. A positive offset signifies that the picture will be projected higher than the lens, while a negative offset means that it will be projected lower. It's crucial to pay attention to the positive offset since the projectors are positioned upside down. Projectors that include a vertical lens shift feature make it possible to change the picture height without moving the projector. Adjusting the lens shift on your projector while holding it at various heights is a good test before attaching it. For projectors without vertical lens shift (i.e. a fixed vertical offset), the suggested height must be followed to the letter. Find the horizontal lens shift If your room's arrangement requires that the projector be mounted near the center of the screen, you'll need to calculate the horizontal lens shift. The rules for horizontal lens shift are almost the same as for vertical lens shift, except that you use this formula to figure it out: screen width x offset percentage = distance of lens to left/right of screen center. This may distort your picture and interfere with your vertical lens shifting if you use a horizontal shift. Choose Your Screen Determine the size and location of the screen you want to use. The traditional location for the screen is on the other side of the entrance doors since it should not be placed where there will be a lot of foot activity across the screen. To obtain a sense of the clarity and brightness of the picture, project it onto the screen from a table. It should have sufficient light output for the intended purpose. If you're watching an educational video, dimming the lights may make it difficult to take notes. In strong sunlight, it may be difficult to see text on a computer screen. Now is the best moment to get a larger projector, either via trade-in or return, if it's a new one. In order to get the most out of your projector, though, you need to construct a screen first. There's nothing worse than a perfectly placed projector projecting on such a painted wall. I know it's a lot of money, but a non-reflective fabric cover will make it appear a million times better. Mounting the Projector It's time to get started with the installation procedure after you've decided on the ideal mounting kit for you. Connecting the wall studs correctly is the first and arguably most critical step in the installation process. Costly televisions are hefty and bulky. Your main concern is that they don't hurt themselves. When on the ceiling, it's much more obvious! Locate and mark them with a pencil using a stud finder. The TV's weight will not be supported if it is installed merely on drywall. To properly sustain the projector's weight, the mounting screws should run through a stud or joist. In order to get the perfect screen size and center the mount with our back wall, we discovered a joist that was only a few feet away. If your mounting kit is up to snuff, it should include a paper template on which you may mark the location of your center hole. Then, using a drill bit large enough to accommodate the heads of the cables you plan on installing, bore a hole through the designated place. The mount hole cover completes the smooth appearance after the wires have been phished. In order to find a ceiling joist, though, you may use your palm to tap the vaulted ceiling and listen for a sound. Stud finders don't work on vaulted ceilings, therefore this is why. Drill a pilot hole to see whether I have located the ceiling joist using a regular power drill and drill bit. The ceiling joist is easy to see when drilling is tough or when it feels as though I am drilling into something harder. Adjust the throw distance based on the mount-to-lens distance. Measure the length between the mount's center and front of the projector's lens using a tape measure. Make sure that the projector's lens as well as the screen are not too far apart. An initial throw distance of 16 feet would be increased to 16.5 feet by adding 6 inches to the distance from the mount to the lens. You may also use various vaulted ceiling projector mounts to hang a projector. These mounts include a base bracket that can be tilted up to 90 degrees to adjust for vaulted ceiling. Utilize Drywall Anchors You may use drywall anchors instead. Whether you need to be able to repair the ceiling after removing the projector will be determined by the weight of the mount. A wider hole in the drywall may be left behind by using anchors instead of screws to connect to the studs. If so, where can I get in? If this is the case, climb to the top and note the stud's position and height from the top. Drilling a pilot hole from the top can help you determine the best working location. This is more secure than a dry wall anchor, in my opinion. Read: How To Pair JBL Headphones Use Projector Ceiling Plate Place this on top of the location where the projector is supposed to go in order to install it. Screw the plates into place if you have a vaulted ceiling. Make that the screws are inserted into the studs for maximum security. You may want to put in some studs there if there aren't any.) Making a hole in the roof for the pipe to pass through is the next stage. The bracket is attached to this pipe and the bracket to the projector. This projector ceiling plate comes with a bracket, so be sure to get one of them as well. Installing the mount and the projector is a breeze after that. Read: How To Connect Samsung TV to WiFi Without Remote DIY Projector Mount Want to avoid spending money on a projector mount? You can make one yourself. You'll need the following: The bottom screw holes of your projector accept short screws or bolts. A tool for turning screws. A drill 3″ dry-wall screws About 1/3 of the projector is made up of a thin piece of wood, plastic glass, or metal. A small piece of glass, plastic, or metal. Follow these easy steps once you have all of that: Your projector's bottom should be adorned with wood, glass, or metal. Make sure it sticks out from the back of the projector about an inch. Drill holes in the wood, glass, or metal platform that are the same size as the screw holes on the projector. Drill two more holes in the protruding part. Screw the base to the projector using a screwdriver. Get your little chip/hook then drill a hole at the bottom using the following step's directions. To attach this chip to your projector, screw it in place. You'll need to drill a dry-wall screw into your ceiling to begin. Make absolutely sure it hits a stud. To keep the projector's front in place, screw the chip/hook that's been connected to it to the dry-wall screw. Last, put the platform together with the other two dry-wall screws. This will hold the projector's back to the ceiling. Read: Why is My Vizio TV So Slow Connect the wires for the projector The most difficult and challenging phase of the project is finally over. Once the wires are going down the wall, you'll need to drill a hole in the top stud that runs from your attic. Pick up some drywall and drywall mud now. Cut the damaged sheet rock to the nearest studs, and then cut a patch piece to replace the gap. The sheet rock muck then carried us to the seams. Make a hole in the wall to accommodate your wiring, and then use a faceplate to conceal it. From the attic, run all of your cables through the wall. If you're having trouble phishing your cables, try pushing them down the wall using a phishing snake. Make sure your projector's HDMI wire is securely tucked away by hiring an electrician who can put a power plug into it. Alternatively, if you're looking to save money, you may run the wires through the wall in trunking. Fine-tune the projector's picture Make adjustments to the projector's zoom, lens shift, and focus using the projector's instruction manual. Set the projector's contrast, color, and brightness according to the directions in the instructions. Adjust the picture so that it is as accurate as possible before moving on to fine-tuning. While fine-tuning your vehicle, this should help save you time and hassle. Make sure your projector is set up so that you may enjoy watching it as much as possible when you've finished installing it. Final Thoughts Using your vaulted ceiling to install your TV is perhaps one of the finest decisions you make in terms of design and space management. Remember that safety is the most important consideration while putting together your projector mount. It's important to choose the right mount for your area and requirements. These procedures are essential to connect a projector in the unusual scenario of a vaulted ceiling. What if you don't want to accept it from me? Then accept it from the intelligent engineers who've done the math! FAQs This FAQ is here to solve some of your problems. let's find out those answers. Can a ceiling hold a projector? Not even close. First, the drywall will probably fall over time, leaving a permanent bump. That's if the screws that hold the drywall to the ceiling don't come loose. Not just the projector falling is a risk in this situation. Can you hang a projector screen with command strips? Admittedly, it is dependent upon the mounting options available for your screen, such as whether it can be installed flush against the wall or whether it has a mounting point on the ceiling that can accept bolts. Start by getting some of those command strips. Then, put a lot of gorilla glue on the top of the screen and stick it in place. How high from floor should projector screen be? There should be around one-third of that space between screen and chairs in your media room for screen height. Place it between 24" and 36" above the floor, as the best vertical viewing angle is between 15° and 20°.
-Read More
8 inch vs 10 inch Subwoofer For Home Theater
Do you know exactly what sort of sound you want to hear from your 8 inch vs 10 inch Subwoofer Home Theater? I think not. But I can tell you that having a clear bass can make your whole listening experience better, no matter what you have been playing. Having a subwoofer is important for that. There are many things that determine how well subwoofers work, but one of the most significant is how big they are. Even though there are a lot of different sizes, the two most common subwoofer sizes that audiophiles choose are the 8 inch and 10 inch subwoofer. What makes them unique? What makes some people choose one over the other? Keep reading to learn more! What is a subwoofer, and why do you need it? Bass is the main thing that a subwoofer is all about. At a frequency of 20 to 200 Hz, it's a loudspeaker that can make low sounds like bass or sub-bass. An air pump that has low-pressure power can be thought of as a big air pump that injects low bass frequencies, no matter what kind of music you're listening to or what kind of sound effects you hear in movies. Subwoofers aren't very important now, because you already have a loudspeaker that can play the bass you need. There are subwoofers that let you feel the bass instead of hearing it through bookshelf speakers. If you have a good subwoofer with your normal loudspeakers, it will make your whole sound system sound better, too. This will not only make your loudspeakers work less hard, but it will also add more width and depth to your sound stage. Adding subwoofers to your sound system will make a big difference in how well your stereo imaging is done, how interesting the dynamics are, how vibrant and pleasant the sound is to the ears. Getting a subwoofer isn't going to make your music sound better, but it will make it sound better. Choosing The Right Sized subwoofer: Subwoofers are usually small boxes that really can fit under a table, but only by a very small amount. It usually has a driver (the part that makes the noise) inside, as well as an amplifier to power it. This will help the driver do its best work. In general, a 10-inch driver should have a good-sized box, while an 8-inch driver can have a small box. In this case, the driver has to work very hard because bass waves are long, so you can't hear them at all. In one way, you can do this is by getting a bigger driver. A 12-inch driver is a common size, but you can also get 15-inch ones. Some subwoofers have more than 1 driver that can deliver accurate and precise bass response.  People can also have a lot of power. As the size of the driver and the cabinet shrink, the power needs to go way up just to make up for it. Even though an 8-inch sub in a tiny box could sound like a 10-inch sub in an even bigger box with much more power, this isn't true. 8-inch subwoofer: If you want to improve your home's stereo system but don't have a lot of space, an 8-inch sub is the answer. Some 15- to 18-inch subwoofers are bigger and more powerful, but these smaller ones work just fine in smaller rooms. These small subwoofers, despite their compact size can deliver punchier bass. This is due to advanced and intelligent engineering methods. In addition, because 8-inch subwoofers are usually small and light, they can produce accurate bass. Reasons to choose a 8-inch subwoofer You can improve the bass of your music by adding more. The most powerful 8-inch subwoofer would then make your music sound better than it would if you used the speakers only. They will make the low ends sound more powerful and impactful.  An 8-inch sub will have more power and impact, no matter what. Clean look: Thin and sleek designs will give your room a clean look. If you like minimalist room decor, the 8" subwoofer is for you. Great for compact spaces: 8" subwoofers have sleek and slim design. These low profile subwoofers are ideal for users who have space limitations. Some subwoofers can be place horizontally or vertically. Others can be easily placed under couch.  Power a 5-channel amplifier. Small subwoofers can work well with a five-channel amplifier, even though they are small. The more powerful subs usually need their own Monoblock amplifier and a separate amplifier for the speakers, so they don't work together. 10-inch subwoofer: 10 inches is the second most popular size for subwoofers in the market, after 15 inches, which are the most popular. These are mostly known for being small and quick. It's easy to put in the 10-inch subwoofers, but they have a more powerful bass response and better sound quality than the 8-inch subwoofers. If you like metal, rock, or country music, these subwoofers could be the right choice for you. Why a 10-inch subwoofer is better: The bass has been made better: Under 80 Hz, the subwoofers can playback sounds. This adds just the right amount of depth. High-frequency performance has gotten better: With the subwoofers, the tweeters and woofers can have the most midrange and high frequencies possible, so they can make the best sound. The ease of instalment: The 10-inch subwoofer is smaller than the other subwoofers. It's easy to set up because it's the same size all over. A more mellow audio experience: The subwoofers will give you rich and dynamic sound that won't change the sound. 8 inch vs 10 inch Subwoofer: What sets the subwoofers apart? The main difference between the 8-inch subwoofer and the 10-inch subwoofer is how much bass they can make. Because the 10 inch subwoofer is bigger, it can move more air than the 8 inch subwoofer can. This means that the 10 inch subwoofer is a lot louder than the one it is competing with. However, the 8 inch woofer is easier to set up because it is lighter than the 10 inch woofer. Another thing that is affected by the size of the subwoofer is how good the sound is going to be. Most of the time, smaller subwoofers are better at controlling fast, tight bass notes than bigger ones. This is why the 8-inch woofer gets points. Let's get into a more in-depth comparison. Voice Coil Diameter: 8 and 10 inch subwoofers usually have different sized voice coils. An amplifier sends power to the voice coil, which is made of metal wire. This wire sends that power to an electromagnetic field that moves the driver forwards and back. Size of the voice coil is often linked to how much power it can handle. As a rule, you should pay more attention to the power handling and low frequency performance expressed in hertz than speaker size. Frequency Extension: Hertz are used to measure low frequency extension, and you want to find the lowest number possible. As an example, when a subwoofer goes down to 18 hertz, it makes more low-visceral bass than when it goes down to 22 hertz, which makes it sound more "rough." This is true no matter how big the cone is. Driver size isn't always as important as enclosure size in this case because of how speakers work inside of them. Larger enclosures are usually better at extending low frequencies, but smaller enclosures save space but cut down on extension. You can look at the sub's documentation to find out what kind of enclosure it was made for. Excursion: The more power the subwoofer could handle, the farther the driver can move. This is called excursion. This, in turn, means how much bass energy the subwoofer can make. As a result, the farther a speaker moves, the more air it moves. This means that the bass is lower and more powerful. In theory, if there are two identically built 8-inch and 10-inch subwoofers, the 10-inch one should move more air. Due to their weaker suspensions and materials, less powerful subwoofers usually have less excursion. Room Size: Subwoofer and room size relationship is quite important to understand. In a home audio or theatre setting, the size of the room is very important. If the sub is too small, you don't hear much bass. Too big a subwoofer could cost you money or make it hard to place. Between an 8-inch subwoofer and a 10-inch subwoofer, these things aren't big enough to make a big difference. However, if you add a second subwoofer of the same size to a room that is more than 3,000 square feet, the natural peaks and valleys in bass response are less noticeable. Top 10 inch Subwoofers: We have picked out the best 10 inch subwoofers in 2024 for you. Yamaha 10″ 100W Powered Subwoofer It is safe to say that Yamaha's 10" Powered Subwoofer is another one of their many successful products. A multitude of cutting-edge technologies, like Twisted Flare ports, YST II, a built-in amplifier, and more make it possible for it to function admirably even with a 100-watt input. Because of this, its output is full of character and extremely punchy, which is exactly what a decent bass should sound like. The Yamaha 10′′ 100W Powered Subwoofer is capable of producing bass output as low as 25 Hz, despite its modest power level. Also, the Yamaha 10′′ 100W Powered Subwoofer has a 180 Hz maximum frequency response. The design of this subwoofer is basic yet attractive, unlike most other subwoofers. [ds]-999-[/ds] Sony SACS9 10-Inch Active Subwoofer The Sony SACS9 is an active subwoofer with 115 watts of power and a frequency range of 28 Hz to 200 Hz, making it ideal for a wide range of applications. As a result, the Sony SACS9 is a great choice for listening to high-quality music. Next, let's talk about the Sony SACS9's build quality. It has foamed mica cellular woofers that are reinforced to keep sound from leaking out at all times. The speaker and line-level inputs on the unit can be used to connect it to home theatre systems. Subwoofer: You will also get RCA cables and detailed instructions on how to set up the subwoofer. [ds]-1005-[/ds] Klipsch R-100SW 10″ Subwoofer: The Klipsch R-100SW subwoofer has 300 watts of power, which is roughly three times as much as the Klipsch R-100. Despite its high price tag, it has a frequency range as low as 32 Hz, which is ideal for producing deep bass. Copper IMG woofer is used in the subwoofer, which has a front-firing design. Allows it to run at 300 watts peak capacity thanks to an all-digital amplifier integrated in. Low pass crossover and phase adjustment are also included in this subwoofer's features. The LFE RCA ports on the back of the device must be used for input. As a result, the receivers may be used with a wider range of audio equipment. Subwoofers are activated automatically when playback begins if they are linked to an audio system. In addition, Klipsch offers a 5-year warranty. [ds]-970-[/ds] Top 8 inch Subwoofers: We have chosen the best 8-inch subwoofers for you, so you don't have to. Jamo Studio Series S 808 subwoofer:  The Jamo S 808 8” is an impressive subwoofer available at a cheap price. With a sleek design and flexible placement, the sub can be hidden even under the couch. It delivers clean, articulate and tight bass. This subwoofer model is perfect for compact spaces. It will give the adequate punch without breaking your bank. The sub also comes with easy connection method and phase switch. [ds]-1011-[/ds] SVS 3000 Micro Sealed Subwoofer: The SVS 3000 Micro Sealed Subwoofer is the best for audio enthusiasts who want quality sound. You need to have a good budget because the subwoofer is quite costly. It will fit into tight spaces. The subwoofer produces bigger bass compared to its size. Unlike others, it has 2 8” woofer drivers that are responsible for producing accurate bass. Tweaking or adjusting the sound is much easier with multiple settings and app. [ds]-1012-[/ds] More About Subwoofer: The basic difference between a woofer and a subwoofer? This is the first thing that makes them different. The woofer can go from 20Hz to 2kHz, but a subwoofer is better and can go from 20Hz to 200Hz. Because subwoofers have a lower frequency range than woofers, they are usually bigger in size. In order to get the deep bass, you need more space for the driver to move so that it can do its job. Finally, subwoofers are more specialized than woofers. There's no doubt that woofers are great. They do the job. But if you're an audiophile who always wants the best sound, subwoofers are there to help you get the best out of your music. Take a look at the Details Guide on the Woofer and the Subwoofer to learn more about these two things. Types of subwoofers? It's possible to divide subwoofers into two groups: passive ones and ones that are powered or have a lot of power. Passive Subwoofer: These subwoofers need to be powered by a separate amplifier or Audio/Video receiver in order to work. This makes them similar to people who speak. There are passive subwoofers that need more power to make low-frequency sounds, so the amplifier or receiver needs to be strong enough to keep up with them. The size of the room and the subwoofer speaker will decide how much power is needed. Active or Powered Subwoofer: The active subwoofers are all on their own. This indicates that both the subwoofer speaker as well as the amplifier are in the same cabinet together. This type of subwoofer doesn't need a power source from outside the house. Because powered subwoofers are so easy to use, they are more popular than other types of subwoofers. As a result, the amplifier that is needed to run a passive subwoofer can cost more than the subwoofer itself. So, active or powered subwoofers are better. What about the EQ? EQ processing is built into certain subwoofers and many receivers. These devices play test tones through your speakers and subwoofer and then create a setting for your room that fits your speakers and subwoofer best. Some of these can do a lot to help cut down on the frequency response's peaks (over-accentuated notes).  Because the room acoustics are making it hard to hear certain frequencies, they can't fill in the gaps that they can't reach. These things aren't magic. In this case, they can't make a cheap, low-powered sub sound like a high-powered one. They can't make up for poor sub placement, either. But they do help. If you have the chance, you should look into them if you have the chance. Having good bass vs. more bass: A good subwoofer, when placed correctly in a room, can make deep sounds that sound real, not just the thump-thump. With any speaker system, the goal is to accurately reproduce all frequencies in the audio spectrum so that they sound the same to everyone. A boom sound isn't made by the best subwoofers. They make more bass than small speakers can, which makes them better. Good bass isn't always more bass, but better sound quality. This will give you a more realistic sound picture of what's in the music or movie. If you want to add more bass than that, you can certainly turn it up. The important thing is that you don't have to. The problem is that specs alone can't tell a good subwoofer from a bad one. If you buy an 8-inch, 100-watt sub, it might sound good, but if you buy a 10-inch, 500-watt sub, it might sound bad. In this case, reviews are very important, and you should try to find them. So there isn't a rule like "10-inch 100-watts for 'X'-size room," but in general, bigger, more powerful subs will work better even in smaller rooms. In a big room, or one that's open to the rest of your house, a 10-inch, 100-watt sub won't be enough. As a rule of thumb, 10-inch, 100-watt subs are the minimum. Keep an eye out for subs with less than 100 watts. If the driver is smaller, you'll need a lot more power to get the same sound. It's true that there are some exceptions, but this should give you a good place to start. Final thoughts: If you're an audiophile who likes a lot of bass, you always look for the best subwoofers on the market, like this one. With so many different features, it's hard to figure out which subwoofer can hit you with the right thump. If you like a lot of bass in your music, you should get a subwoofer that is the right size for you. If you like to listen to rock, country, and metal music, the 8 inch subwoofers are a good choice. On the other hand, if you like to dance to party music, the 10 inch subwoofers can give you just the right amount of bass to get your feet moving. There are a lot of other things to think about, too, not just the size of the subwoofer, when it comes to how well it works. You should look at the subwoofers, listen to them, and then choose one that you think is right for you. FAQs Well, this faq is here to solve some of your problems that may arise while walking in the pavement of best subwoofer. Is an 8 inch subwoofer enough? An 8-inch "The subwoofer is going to give you tight, clean bass that you can listen to all the time. It's possible to find 8-inch subwoofers that sound great, and some people might even say they sound better than a lower-end 10 or 12 inch subwoofer. In general, an 8-inch subwoofer will give you nice, cheap, clean bass. What size subwoofer hits hardest? If you buy a subwoofer with a 15-inch diameter, it will be the most powerful. It's because they are so big that they will have the deepest bass. Are dual 8 inch subwoofers good? They go together very well. You should buy these dual 8-inch speakers if you want to hear good, deep bass sounds "subs with the box. As other people have said, these 8" subs sound more like good 10" subs. 
-Read More
Blackweb Soundbar Review
Blackweb soundbar fulfills your eternal thirst for a soundbar to provide a soothing musical environment. Experts and users around the globe have attested that Blackweb soundbar is worth buying in terms of quality and immersive musical experience.  Blackweb soundbar is an all-in-one speaker system that offers amazing audio with high quality and slim design. The excellent cabinet of the soundbar comes with a very strong speaker that offers you a booming sound.  Possessing a Blackweb soundbar means that you have purchased a home theater system and there is no need to expand the system to get a home theater surround sound system.  The strong subwoofer itself is the proof of providing room shaking loud sound. Its quality bass response leads to seamless, crystal clear sound.  Blackweb 5.1-Channel Soundbar  Key Highlights: Advanced Bluetooth connection Wireless subwoofer 37” compatibility  5.1 channel Create a room filling ambience with this amazing wireless Blackweb Bluetooth 5.1 channel soundbar. It offers you plenty of features with a very strong configuration. The configuration includes an wireless subwoofer that works relentlessly to produce deep bass and extra loud sound.  While purchasing this soundbar you will be delivered a  remote that ensures your comfort zone by making you able to control the sound sitting far from the devices. As an avid audiophile you will be happy trying this surround sound system.  It has a variety of advanced options like the wireless Bluetooth technology. You may turn it on to pair at any time and enjoy unlimited streaming music with crystal clear sound.  It has multiple device connectivity and connects with TVs, tabs, PC, smartphone and other devices.  Another of its key features include the connectivity with various ports. It possesses universal audio inputs, one optical and one coaxial digital and RCA-type analog.So, connect to the devices without any hassle at any time.  Even if the Bluetooth is not working, you can utilize the line-in-jack feature  to connect to your MP3 player.  It’s an easy installation system with a very affordable price. What We Liked Low price Amazing sound output Surround sound system Nice design Multiple device connections Various ports What We Didn’t Like No Dolby Atmos and Dolby Digital features Black Blackweb BWC18SB001 Key Highlights: 2.1 channel 37’’ Soundbar Advanced Bluetooth connection  Get an immersive experience with this amazing Blackweb BWC18SB001 2.1 channel soundbar. This soundbar brings you advanced wireless technology capable of being linked with smartphones, laptops and tabs.  The universal sound connection inputs, Optical and Coaxial digital connections are its standout features. The RCA-analog system and all these inputs make you enjoy your music and movies with utmost pleasure.  It comes with line-in-jack technology for the MP3 audio format. You will get an internal subwoofer that promotes amazing bass response to provide you seamless, crystal clear sound. A sleek remote includes all the modern features that a remote should have. The price is very much affordable and you can install it without any hassle within a very short period. The accessories that come handy while you purchase the soundbar include cables, keyboards and headphones that enable you to connect your computer with the soundbar system. Get into the system and enjoy the immersive experience that is highly recommendable.  What We Liked Wireless Bluetooth technology Universal sound connections Line-in jack technology for multiple audio formats Remote control ability Internal subwoofer Affordable price What We Didn’t Like Lack Dolby Atmos and Dolby Digital features Blackweb 32-Inch 2.0 Channel Soundbar Key Highlights: Google Assistant  32-Inch compatible 2.0 channel An extraordinary piece of soundbar with an amazing sound that satisfies the user's choice. This smart soundbar is an effortless system and enables you to control it with the voice command option. It possesses excellent stereo audio delivery options and provides you with an improvised audio experience. This all-in-one soundbar system has a standout feature, and that is Google Assistant function.  Google assistant service offers a plethora of voice control capability. You can control the voice, voice searching and voice activated device control.  To discuss its design, it is an elegant look soundbar with a sleek design that brings versatility in color and functionality.  You can easily install and pair the soundbar without any hassle. Advanced Bluetooth connection, optical input and RCA analog input are its other standout features.  Just pair your devices to enjoy unlimited streaming from tabs, laptops and smartphones. It is also compatible with TV brands like Sony, TCL, LG and Samsung.   The remote control capability is extraordinary and the power handling capability is 15 watts.  What We Liked Affordable price Excellent design Compatible with various TV brands Multiple device connections Easy installation process Bluetooth technology What We Didn’t Like Lack 5.1 system Lack Dolby Atmos and Dolby Digital features Blackweb Soundbar Review Blackweb is one of the most known electronics conglomerates in the last decade. It offers various electronics products that come with affordable prices and high quality. Walmart is the parent organization for Blackweb.  Blackweb has shown it’s extra level efficiency in manufacturing electronics devices and peripherals. Walmart is the parent brand for Blackweb soundbars. Blackweb offers electronic products like Bluetooth, soundbars, speakers, smartwatches, handsets etc. with superb quality and affordable price.  The best thing about Blackweb is the extraordinary quality and such a price that enables its buyers to feel comfortable. Blackweb Soundbar subwoofer: As a music and movie enthusiast, you definitely want your soundbar to be the best to produce sound. A subwoofer can make your dream come true. Subwoofers play the key role in improving the sound quality of a soundbar by reproducing the lower frequencies, which are otherwise known as the bass. The bass is further amplified through the woofer to produce extraordinary sound quality. Soundbars come with both built-in and external subwoofers.  Be happy to know that Blackweb soundbars have a built-in wireless subwoofer, which is a great choice for getting rid of a plethora of wires that make your room look clumsy and make it difficult for you to operate. The built-in subwoofer makes the Blackweb soundbar look slim and improvise the sound quality for your utmost enjoyment. It also helps you install the soundbar without much hassle. You just need to connect the subwoofer outlet to the power cord. Next, just turn on the soundbar and enjoy unlimited music and movies. Design Blackweb is known for its awesome design electronics. These soundbars acquire beautiful and metallic grills. This soundbar has a port at its back. This part gives you wire ports to connect it with other electronics. But it does not have a USB port. The body of the soundbar comes with high quality and the color is ebony.. On the topmost side of the soundbar, Blackweb has put the controls on the Soundbar.  Blackweb has a plus-minus volume controller, source TV, and power button to control it. It weighs 3.97 pounds. It is a 2.0 channel speaker and the dimension measures 32 inches. This design makes this soundbar very compact and user-friendly. Accessories Blackweb provides a wide range of valuable accessories, which you will need while installing the soundbar. The list of accessories include the product manual, a remote built of plastic, audio cables, one power adapter and last of all a sticky rectangular part. Front Panel All the speakers, LED indicators (power on and off, Bluetooth, pairing mode, AUX and Optical in, Volume mute) are situated in the front part of Blackweb soundbars. Additionally, the remote-control sensor is also available on the front part, which is developed to catch signals from the remote. Top Panel Power button to turn the soundbar ON and OFF. The volume buttons, mic mute buttons and the microphone are also available there. Remote Control The Blackweb is remote controllable and the remote control offers a wide range of options as Power Button Switches the unit between ON and OFF modes. It makes the switches to shift between the ON and OFF modes.  Volume button The “+” button increases the volume and the “-” button decreases the volume. AUX Button This button enables you to shift to the AUX mode. Bluetooth Connection Advanced bluetooth connection can be controlled by the remote and can be paired easily Optical Button You can switch to the optical mode (K/P/M) with this button. Mic Mute Long, press the button to mute the mic and do it again to unmute.  Sound Quality The users have reviewed this Blackweb soundbar. The power controlling ability of 120 watts is a great feature that makes the listener feel the power of the sound coming as seamless and with much clarity.  Once charged, it can serve you for 8 long hours. The long life battery enhances its quality. You can use it for 7-8 hours without needing to charge the battery frequently. Remember, the battery longevity is making your whole day with amazing undistorted sound.  Also, you have the option to adjust the volume level as per your choice. You may maximize it to the highest or minimize it to the lowest level of volume and enjoy crystal clear sound without any issues. So, in terms of sound quality, Blackweb is one of the greatest choices you will ever make. It gives you the vibe of playing an orchestra sitting in your room. Now, the choice is yours.   Price Blackweb soundbars come with a good reputation and reliability to their customers. The reason behind this trust links the low price with excellent qualities.  Take note you are getting the Blackweb soundbars under 200 USD with amazing features. Expensive soundbars can cost you more than 500 USD to even 1000 USD. To your utmost surprise the Blackweb 32 costs only USD 70 which is unimaginable for other branded sound bars available in the market. There are not many soundbars with such a low price that accommodates the Google assistant feature! Audio Modes The audio modes that the Blackweb soundbars offer are worth mentioning. The overall view of the Blackweb soundbars have a plethora of buttons and modes. Have a glance at the soundbars from the front and top side and you will find all the buttons you need. Easiest guide to the Blackweb Soundbar Installation Blackweb soundbar offers you a very easy and hassle free installation process. Installation is one of the key parts to your quality sound experience. The following steps are to be followed in order to install a Blackweb soundbar appropriately.  Find the TV and Soundbar Connectivity Options: Have a glance at the ports of both the devices in order to confirm which port is to be connected with which. Generally, they are placed in the back of the soundbar and the TV and sometimes on the side. HDMI, HDMI ARC inputs are the best and also highly available nowadays, but optical input systems are also noteworthy and good options.   Connect the Cables to the Ports Now that you have identified the input options, the salient step now is to connect certain cables for certain ports. This is a very important part and requires your utmost attention as the success of this phase will lead you to amazing sound experience. Meanwhile, any inappropriateness will vex you with frequent issues. Insert cables to ports until a ‘click’ sound is heard. The sound will make sure that the cables are connected appropriately. Take note that the cables are the accessories that will be provided when you buy the soundbar. HDMI cables of standard 2.0 and above are compatible with any devices. However, you need to make sure that the optical cables are compatible with the device. Turn ON the Devices In this step, to turn on your devices you can either use the control panels (modes and buttons described earlier in the feature part) or the remote that comes with the device.   Settings Adjustment Now, the final step requires quite a few adjustments. All the major part of connecting  multiple cables and adjusting them are over. The following final steps are your final pathways to enjoying listening to unlimited music and watching movies.  First, reset the device by pressing the power button and keep pushing until a light emerges which will first be red in color and later on turn to be green. After pressing the power button for a few seconds, it will turn out to be blue. It is an indication that your device is prepared to be connected with the nearest Bluetooth devices.  The next step is to move to the Bluetooth setting on your Phone, TV or Laptop. The Blackweb soundbar Bluetooth connection will pop up on the device list. You just need to pair the devices and enjoy unlimited streaming music and movies with the soundbar.  There is an alternate way to connect the HDMI inputs with the soundbar. If you wish you can readjust the bass response, treble and other audio features with the remote.  FAQs Why to choose Blackweb soundbar? The key problem with the soundbar is that users often need to compromise with the price and quality . It creates a conundrum. Blackweb soundbars are a great solution to this problem. Unlike other expensive soundbars, they keep a balance in price and quality. Blackweb soundbars are a great affordable soundbars that comes with advanced features like, Google assistant, surround sound feature, multiple device compatibility, Bluetooth connection etc.  What is the function of the Google assistant in Blackweb soundbar? Soundbars with Google assistant feature come with plenty of functions. The advantages include the following: Pairing: Google assistant aid soundbars to pair quickly to the whole home theater system required the perfect device is connected.  Voice Control: You can control your music and overall system sound by the Google assistant function quite easily. It is compatible with multiple devices like tabs, digital TVs, laptops, smartphones, etc. Final Thoughts  To sum up, the Blackweb soundbar gives you a resplendent sound with modern features. It comes with an easy installation process and multiple connection ports. The soundbar comes with longevity and a beautiful design.  The Blackweb soundbar offers a plethora of advanced features like modern Bluetooth connection feature, surround sound system (5.1 system) etc. Audiophiles have highly reviewed the soundbar and attested its beautiful design, bass enhancing subwoofer, affordable price, various audio modes and connections, capable remote and most importantly room shaking crystal clear sound. You can easily choose Blackweb as your best buddy to enjoy unlimited music. 
-Read More
Best preamp for Audio Technica Lp120
By adding a phono preamp, also called a phono stage, to your turntable, you can make it work with modern amplifiers. Aside from that, it also has standard equalization. So then, why do you need one? There is a chance that your turntable doesn't have one. If it doesn't, you won't be able to play records that have one. Or maybe you just want to make the sound better than what the device's built-in preamp can do. Like many other types of products, phono stages can be bought at a wide range of prices. But whether you want to save money or spend a lot, we have a phono preamp that will meet your needs. We've used our extensive review archive to pick the best phono preamps on the market right now, so you can be sure that the product you buy is of high quality. Here are the best preamps for Audio Technica Lp120. Rega Fono MM MK2  Pros  Detailed and spacious performance from the   Excellent management of the timing and dynamics  Updated  sleeker design  Cons  Nothing to mention   To say that there were high expectations for the successor of the Rega Fono MM MK2 would be somewhat of an understatement. The Rega Fono MM MK2 was widely regarded as one of the finest phono stages that could be purchased. Thankfully, it not only meets them but exceeds them as well. The design has been refined to within an inch of its life, which has resulted in a product that is significantly more streamlined while preserving the winning simplicity of its forerunner. The sound of the MK2, which won an award for its quality, now has a greater dynamic range and greater clarity, making an already excellent performance even more impressive. The phono preamp that offers the best sound quality for its price.  Cambridge Duo MC/MM Pros  Full-bodied and warm presentation from the   Times well, good dynamics  Beautiful to look at and a joy to put to use  Cons  Not nearly as powerful as it could be  This one is a real winner. It's clear that a lot of thought went into making this device because it has an offset volume dial, a simple design, and labels on the back that are easy to read even when you're looking over the top of it. Also, the audio quality has not been in the least bit ignored. Overall, the presentation is excellent. It has qualities like space and unity, as well as dynamic sound and perfect timing. Even though it can't quite compete with the Rega Fono MM MK2, it does a good job of keeping up with itself, which shows that it deserves to be taken seriously. Edwards Audio Apprentice MM  Pros  A satisfactory amount of specifics  Timing and dynamic range are both important.  Music that is skillfully knit together.  Cons  Nothing at all considering the cost.  It's as rare as hen's teeth to find phono stages that aren't too expensive but still sound great, so we're very excited to see a new competitor in this space. Even though it is small and doesn't look like much, a lot of work has gone into how it works on the inside. They give a song's vocals enough weight without drowning them out with bass. In addition to this, it has a great sense of timing. One of the best phono preamps you can buy for the money. Rega Fono Mini A2D   Pros  Musically excellent  At this price, you get a lot of space and detail.  Ability to rip vinyl  Cons  There is not much to see here.  After more than half a decade since its introduction, this phono preamp continues to be one of the best that can be purchased for less than £100 or $100. The tracks are served up with heaping helpings of zeal and enthusiasm, with an additional helping of musicality and dynamics on the side. Additionally, given that it comes equipped with a USB port, you can use it to digitize your record collection.  Moon 110LP v2  Pros  Presentation that is polished and unbroken  Imaging in stereo that is very spacious  Outstanding construction and end result  Cons  With moving coil cartridges, the argument is less compelling.  Even though it doesn't have the most catchy name, the 110LP v2 does an excellent job of enhancing the sound quality of your vinyl records. The tidy aluminum box is finished to the high standards set by Moon, and it is switchable, which means it is capable of handling both moving coil and moving magnet cartridges. Moon's high standards were met in the production of this box.  This phono stage will be suitable in terms of its quietness and lack of hum provided you keep it at a safe distance from other products that are powered by the mains and power cables. Even though the features aren't particularly advanced, it's obvious that the Moon put more of their attention into the sound quality.  Because of this, the Moon 110LP v2 is thought to be one of the best phono preamps you can get for this price. It makes a sound that is smooth, fluid, and refined but still has a satisfying punch, and it works especially well with moving magnet cartridges. It is highly recommended that you give this little box a try if you are looking for a phono stage that is both high in quality and affordable.  Graham Slee Gram Amp 2 Communicator  Pros  Class-leading specification  Absolutely impeccable timing  Sound that conveys meaning  Cons  When it comes to weight or punch, it’s not the best  Another tried-and-true favorite that continues to deliver, the Gram Amp 2 is as relevant today as it was when it was first introduced to the market six years ago. You can see why this is the case; simplicity is the name of the game here, and it is an approach that holds up exceptionally well over time. It is a moving-magnet phono stage that only has one output and one set of inputs; there are no additional features or bells and whistles. The sound quality is of the highest caliber; it is incredibly detailed, with the upper register being especially impressive. Additionally, there is a PSU1 that can be chosen.  Linear audio upgrade consisting of a 24V DC brick that evens out the variations in voltage that come from a standard household power supply. It will set you back a little more money, but if you want to take this already fantastic low-cost model to the next level, then it is absolutely worth it.  Musical Fidelity LX2-LPS   Pros  Presentation that is open and full-bodied  Fluid dynamics  Ace vocal performances  Cons  It could use some more punch and drive.  It's rare to find a turntable at this price that works with both moving magnet and moving coil cartridges, and it's even rarer to find one that does so with such ease. This phono stage has a lot of features, some of which may not be necessary, but it still performs very well. It sounds very good because it has a lot of space and body, and it has a good amount of bass. Even though it's not the best in this price range, it's definitely among the best. iFi Zen Phono   Pros  Delivers a performance that is clean and detailed  A perfect equilibrium  A multitude of capabilities  Cons  Not the best timing in the class  When you use the iFi Zen Phono, our records will have a simple sound. This is a great addition to the list of good entry-level phono stages. In fact, you will have a hard time finding anything else at this price that is clearer. The iFi Zen Phono is well made, which is what you would expect from a company with such a good name in this field. It plays moving magnet cartridges the best, but it can also play moving coil cartridges. It is also important to note that the balanced circuit design reduces noise and crosstalk, which is a feature that is less common in this market segment. The best thing about this place is how it sounds. Even though it is clean, it doesn't feel at all like a hospital. If the goal of the game is to recreate each note and maybe make it better in some way, Zen Phono is definitely the better choice. The balance is also really good. This product does not provide the same level of enthusiasm and dynamism as a few of the options listed above, but we still can't help but fall in love with its genuine sonic personality. Because of this, I believe that it would be beneficial to try out for the role.  Chord Hui   Pros  Clear and unruffled Sound   Outstanding construction  Neat design  Cons  It could use a little more dynamism.  It is easy to get distracted by the high-quality DACs that Chord manufactures, but we must not forget that the company also produces analogue amplifiers. This phono preamp has a balanced XLR output in addition to the single-ended stereo RCA connections that are used for input and output. It looks and feels like the real deal. Because the process of setting it up can be a little finicky and because there is a wide variety of adjustments to become familiar with, we strongly advise to keep the user manual close at hand.  As long as you use the Huei with a turntable that has adequate capabilities, you will be pleased with the results. The sound as a whole has a pleasant level of overall balance, a respectable level of insight, and an open, stable, and inviting stereo image. Although it is not quite as dynamically expressive as the top performers at the money, it is still a solid performer that ought to be taken seriously.  Rega Aria  Pros  Outstanding perceptiveness  Strong in all respects  MC loading adjustments  Cons  Nothing of significance at all  However, despite its high quality construction, this model is more on the tough than the stylish side. It can work with both moving magnet and moving coil cartridges, which gives it more uses than many similar products. The sound is responsive and quick, which is what you would expect for the price, but what really sets it apart from other, less capable units is its sense of calm. A strong all-arounder that should be paired with a turntable that can do what it needs to do. Musical Fidelity MX-VYNL  Pros  Transparency, that is truly remarkable    Articulate and agile presentation  Outstanding construction and end result  Cons  Absolutely nothing on this level  This device's controls are very easy to use, which makes it a very useful and useful piece of equipment. It's a good thing that's not even close to the only good thing about it. The sound is very clear and detailed, which makes it easy to find low-level instrumental threads and sonic textures. It has a smoothness that makes its competitors seem more mechanical. It doesn't hold back when it comes to biting and attacking, either. A remarkable balance between being smart and being bold. Rega Aura  Pros  Presentation that is both engaging and exciting.  Impressive detail resolution  Excellent construction  Cons  A lack of available options for curves of equalization Incompatible with those that have a moving magnetic field.  When Rega decides to go big, the results are typically spectacular, as the Aura phono stage demonstrates. Rega as a brand typically focuses on the more affordable end of the high-fi market because it caters to a wider range of customers. This is not a Swiss Army knife type of device, as it is solely focused on extracting maximum performance from moving coil cartridges. Those who have moving magnets will need to look in a different location.  When taking into consideration that the vast majority of cartridges that are likely to be used in conjunction with the Aura will be of the suitable type, this is not as much of an issue as it may initially appear to be. After the cartridge has been optimized with the appropriate electrical loading, you will discover that the Aura makes it possible for your record player to sing by delivering a sound that is full of excitement and drive. An entertainer of such high caliber is extremely uncommon in our experience. The Rega Aura is not inexpensive, but when used in a system with the appropriate amount of talent, it is worth every penny and then some.  Cyrus Phono Signature/PSX-R2 phonograph  Pros   A sound that is both balanced and insightful.  Expressive dynamics  rhythmically stable on the feet  Cons  inaccessible and poorly marked  The contrast of the display suffers off axis.  Front panel buttons feel vague  Using a remote control makes adjusting the sound just as simple as switching the channel on the television. Or at the very least, it ought to; despite being an improvement that is much appreciated, the remote control could benefit from having its functions more obviously labeled, as the phono preamp is controlled by only a select few buttons. Alternately, Cyrus could have produced an entirely distinct remote control for this device. However, there are many inputs. The sound is extremely talented, and it is packed to the brim with a variety of textures and insights. Strongly suggested as an option.  Vertere Acoustics Phono-1 MkII  Pros  Performer who is both dynamic and entertaining  Impressive resolution  consistency in meter and rhythm  A wide variety of possible modifications  Simple appearance  Cons  Lacks bling value  The Vertere Acoustics Phono-1 MkII doesn't look like much, but if you're looking for a phono amplifier that costs more than a thousand dollars or pounds, you have to give it a listen. It works well for the price, and it has a lot of helpful features and settings that should help you get the most out of any cartridge. It is full of details and musicality, which makes it a pleasure to hear. Pathos In The Groove   Pros  Refined acoustic production  Modifications to the loading of the cartridge  Excellent construction and finishing  Cons  Nothing to mention   Given that Pathos is renowned for its eye-catching designs, we were somewhat dissatisfied to see its latest collection, In The Groove. A bit conservative, no? Nevertheless, you can't deny that it has the feel of a high-end piece of equipment. It not only looks good but sounds great as well; the presentation has a touch of sweetness, and the harmony is fluid and full-bodied. When you add it all up, you get a flexible phono preamp that will perform admirably with a wide variety of different systems.  Aesthetix Io Eclipse  A sound that is both natural and informative  Exquisite design and build  Use with caution is required.  Cons  Inflexible in its approach  Utilizes a significant amount of shelf space  17 thousand dollars for a phono preamp? Even though it's an insane amount of money, this apartment is absolutely incredible. The sound is truly otherworldly, provided, of course, that you use it in conjunction with some respectable turntables. The ability to convey low-level changes in dynamic range is truly mesmerizing, as is the midrange's beautiful layering, the treble's wealth of insight, and the ability to do so. This is the item for you if you are looking for one of the very best.  Burmester Phono preamplifier 100   Pros  Sound that is fluid, dynamic, and informative  Modular nature  Superb build  Cons  a lack of available options for curves of equalization  On this, switching between moving magnet and moving coil cartridges is as simple as flicking a switch, which is a welcome feature given that expensive equipment isn't always as user friendly as this one. It has almost all the features that were on our wish list, including a test record that comes with it so that you can fine-tune the equilibrium. What about the noise? The warmth that we have come to associate with Burmester is maintained despite the fact that it packs a considerable amount of punch. It's every bit as good as you'd hope for something with such an expensive price tag, which is saying a lot.  Frequently Asked Questions  Why do you need to use a preamp?  The signal level that is outputted by a turntable cartridge is insufficient to be fed into a conventional audio signal input on an amplifier/receiver or powered speakers because it is too low. The frequency response of the signal coming from the cartridge of the turntable is non-linear as well.  A phono preamp, which provides the necessary gain in addition to frequency response correction, is used to rectify this issue (RIAA equalization).  If you attempt to play vinyl records on a stereo that does not have a phono preamp, the music level will be very low, and there will be no bass at all in the music that is produced.  Does a more expensive phono preamp result in higher sound quality?  When it comes to the majority of home audio equipment, a higher price tag almost always indicates a higher quality product. When it comes to phono preamps, the price range of approximately $200 seems to be an excellent compromise between price and quality.  It is possible to construct a phono preamp for that price with components of adequate quality because a phono preamp is essentially just a very simple electronic circuit. If the rest of the equipment in your home audio is not of very good quality, it does not make much sense, in my opinion, to spend more than $200 on a phono preamp before upgrading those other pieces. With the exception of tube phono preamps, where the cost of quality comes at a higher price than it does for solid-state phono preamps, all other things being equal.  What exactly is the main distinction between MM and MC Phono Preamps?  Turntables can utilize one of two primary varieties of phono cartridges for playing records. Both the Moving Magnet (MM) and the Moving Coil are in Motion (MC).  When compared to the signal that is produced by an MM cartridge, the output signal that is produced by an MC cartridge is significantly lower. Therefore, a phono preamp that is MC compatible offers a higher gain than a phono preamp that is MM compatible.  Final Thoughts  The preamps listed above are some of the best on the market, so it would be wise to investigate them. Once you have narrowed down the candidates, you may like to schedule an audition to see their performance.   You can then determine which of the preamps delivers the sound quality you want. You can also use this list as a reference to compare it other amp models or brands not included on this list. We recommend auditioning at least one or two of the preamps on the list to obtain a more realistic comparison. 
-Read More
Sony vs JBL Bluetooth speaker: Different Model for Different Usage
Sony vs JBL Bluetooth Speaker: Comparing Sony vs JBL Bluetooth speakers, you can choose JBL if budget isn’t an issue. It will give you unique color and looks. JBL focuses on producing rich and detailed sound.  The Xtreme 3 and Boombox 2 are some of the best JBL Bluetooth speakers. They have good battery life, aux port and satisfying sound quality. Sony SRS-XG500 is an impressive speaker to spend after. It has good soundstage along with versatile ports. It can also get quite loud. You can choose other models if you want cheap speakers. Sony tries to give you affordable party speakers. While JBL speakers give you crisp-clear sound, Sony focuses on bass. Sony vs JBL Bluetooth Speaker Based On Usage: This section will compare Sony and JBL speakers and find out the best one depend on use case: Best for Mid-sized Room: Sony SRS-XB23 vs JBL Flip 5   [cmp]-786-777-[/cmp] Build Quality: These speakers weigh almost the same. They are very lightweight and highly portable. You can carry it in one hand, take it on your backpack or even when you are climbing. The Sony XB23 has an IP67 rating and is designed to be salt proof. It is tough enough to withstand any bumps or accidental falls. The speaker is covered with high quality netting and is long lasting. JBL Flip 5 If you compare the Sony SRS-XB23 vs JBL Flip 5, the Flip 5 has a IPX7 rating. Although it is quite durable, the Sony is better in this case. Flip 5 JBL Bluetooth speaker is made of plastic and covered in tight fabric. There is also a JBL Flip 5 eco-friendly model that is made of 90% plastic. Sound Quality: Sony SRS-XB23 has 2 passive radiators and can produce tighter low ends. It has X-Balanced driver and due to the 360-degree design, the speaker has broader soundstage. It allows you to choose mono or stereo mode from the app. It has crisp and clear highs and can produce undistorted sound. While sounds impressive, two will shine. The cost is cheap so you can easily afford two of them. This tonally balanced speaker can handle music, TV shows or movies quite well. Inside JBL Flip 5, there are racetrack drivers. Low ends are decent but average. The speaker can get loud enough to fill up mid-sized spaces. It sounds bigger than its size. You will hear rich and impactful sound that makes music enjoyable. It has balanced mid-range. You will hear clear vocals and it can easily play any type of music genre. The Flip 5 has good soundstage. You can pair two of the PartyBoost speakers to play in stereo. Overall, the highs are clear, and it is an engaging speaker. Connectivity: Both these speakers rely only on Bluetooth for connectivity and doesn’t have any ports for wireless connection. They can also connect two devices at the same time. Comparing Sony vs JBL Bluetooth speakers, the XB23 model has Bluetooth v 5.0 along with lower latency. Additional Features: Sony SRS-XB23 has a battery life of 12 hours but if you enable Extra Bass option, it will reduce. With Party Connect, you can pair multiple Sony speakers to work together. It comes with Sony Music Center app that you can use to adjust different settings including EQ, pairing, etc. Basic control options are available on the bar. The JBL Flip 5 has 12 hours of playback. It has several buttons like play/pause, volume up/down button on the speaker. JBL Portable app has 3-band EQ, PartyBoost feature and several other options. One this to note is, the Flip 5 will only work with PartyBoost supported speakers and not with every model (like Flip 4). Which is the best? If you are a bass lover, Sony SRS-XB23 is best for you. It has Extra Bass feature to enhance the low ends. Users who prefer a louder speaker for partying can choose the JBL Flip 5. Sony SRS-XB23 JBL Flip 5 Pros Supports speakerphone Voice assistants via smartphone USB-C charging Cheap Extra Bass feature Cons Average loudness Pros can get louder good physical controls several colors well built can play any music genre Cons No microphone ;     Best ultra-portable: Sony SRS-XB13 vs JBL Go 3 [cmp]-829-746-[/cmp] Build quality: Sony SRS-XB13 is a small and compact speaker. It has plastic body that is covered by metal grille. In case you want a smaller speaker, you can check the JBL Go 3. It is also slightly lighter than Sony. That said, both these speakers are highly portable and best to take anywhere with you. They have straps attached but personally we loved the looks of the rectangular shaped JBL Go 3. The hook in the Go 3 is non-adjustable and short in length but you can adjust the strap in Sony. The speakers have an IP67 rating. JBL Go 3 has a solid speaker body wrapped with net like grille. Rubber protection is used on the speaker as well. Sound Quality: Sony SRS-XB13 is one of the best Bluetooth speakers under $50. It has a balanced mid-range and deep low ends. You can connect another speaker to get a stereo pair. Soundstage is good and videos or movies are enjoyable. It focuses on producing omnidirectional sound and with Sound Diffusion Processor, it works with DSP to fill up the space with sound. It uses upward firing drivers and is one of the best Bluetooth speakers for camping. Although the base of the speaker is covered with rubber for stability, it moves with vibrations. JBL Go 3 focuses on producing decent sound quality. Vocals and instruments have good clarity. It has an average soundstage but plays content in mono. This small speaker produces exciting sound and has decent soundfield. It maintains clarity at all volume levels and is slightly louder than Sony XB13. Listen to audio books, podcasts or enjoy music with the Go 3. The speaker ensures clear vocals and gives solid performance.  It focuses on delivering a balanced sound signature. As long as you can limit your expectations from these small Bluetooth speakers, you will love them. Connectivity: Comparing Sony vs JBL Bluetooth speakers, the XB13 has Bluetooth v4.2 and the JBL Go 3 has the v5.1. They don’t have any ports for wired connectivity and none of them have Wi-Fi. Additional Features: Sony XB13 has a battery life of 16 hours from a 4-hour charging time whereas JBL can last up to 5 hours. The Go 3 needs 2.5 hours to charge. Both these speakers have basic physical controls like play/pause, volume, Bluetooth. Sony has answer receive/end and skip to previous track options, but these aren’t available in the JBL Go 3. In this case, Sony SRS-XB13 is the winner. Which is the best? If you want long battery life with good bass, Sony SRS-XB13 is best for you. In case you want eye-catching aesthetics with clear and loud sound, JBL Go 3 is best for you. Sony SRS-XB13 JBL Go 3 Pros Voice assistants with smartphone Good sound with DSP Extra Bass for low ends Longer battery life   Cons No NFC Pros Lightweight Attractive aesthetics Good clarity Great physical controls   Cons Can’t connect multiple speaker;     Best overall: Sony SRS-XE300 vs JBL Charge 5 [cmp]-790-751-[/cmp] Build quality: Sony SRS-ES300 is wrapped by a silicone cover. It is bigger and heavier than the JBL Charge 5. You can grip it by your hand as it doesn’t have any carrying strap. The speaker is covered with clothe material and feels durable. It can withstand sudden drop or bumps. JBL Charge 5 has a cylindrical design. It feels solid and is made of high-quality materials. Both have an IP67 rating so consider them as outdoor Bluetooth speakers. Sound Quality: Inside the speaker you will find two 1.9-by-2.8” full-range driver along with 2 passive radiators. You can easily choose the speaker to play in stereo mode from mono. It has rich highs and tighter low ends. The line-shape diffuser produces sound at a greater distance and reach the audience. It also has X-balanced driver that produces high quality sound. You can use the Clear Audio+ feature that will adjust sound as per the content. The speaker can be used for all types of contents: movies, music, TV shows. It has good soundstage and can get quite loud. Bass is adequate both for indoor and outdoor. JBL Charge 5 has 52 x 90mm bass driver and 20mm tweeter. Although it can produce clear dialogues, it isn’t actually designed for movies. Music and TV shows are handled well. It has a neutral audio profile with has average soundstage. JBL Sound Pro allows the speaker to produce rich and clear sound with deep bass. Compared to its size, the bass is impressive. You can increase the volume and hear louder sound without noticeable distortion. For compact spaces, around 30% of volume is enough for the speaker to shine. It has balanced mids and clear vocals. Connectivity: The ES300 model has a Bluetooth v5.2 and can connect two devices at once. JBL Charge 5 has v 5.1 and it can also connect a pair of devices. It has USB-A for charging other devices. Additional Feature: Physical controls on the Sony ES300 includes Bluetooth, multifunction, volume, mic mute/unmute, etc. It has easy to use mobile app, but you might need to search for some features. It allows you to tweak the EQ presets or choose different options like DJ Effect , Clear Audio+, etc. There is also a Fiestable app which you need to download. It has Echo Cancelling feature that allows seamless conversation. Party Connect or Stereo Pair allows you to connect multiple or two speakers. Similar to other Sony models, it supports voice assistants via phone. Comparing Sony SRS-ES300 vs JBL Charge 5, the Charge 5 can give out 20 hours of battery life. You can use PartyBoost feature to connect other speakers and create stereo sound. On the speaker there are buttons like play, volume, Bluetooth, etc. This speaker has JBL Portable app with which has basic EQ option but doesn’t support voice assistants. Which Is The Best? In case battery life and additional features are important to you, Sony SRS-ES300 is best for you. For good sound quality with deep bass and accuracy, go for JBL Charge 5. Sony SRS-XE300 JBL charge 5 Pros Environment-friendly Ideal for movies or music Easy to use Line-shape diffuser for better coverage; Cons No Wi-Fi Pros Affordable Portable IP67 rating Impressive sound   Cons No carrying strap     Best for partying: Sony SRS-XB43 vs JBL Xtreme 3 [cmp]-785-747-[/cmp] Build Quality: Sony SRS-XB43 has an IP67 rating and is salt proof as well. This makes it one of the best Sony Bluetooth speakers for beach. There is light on tweeter, speaker, and a multi-color line shaped light on both side of the speaker. Build quality is very good with net-like grille. It might collect dust so make sure to wipe it every now and then. Weighing around 3kg, it is a bit heavy, but you can still carry it around. You can easily attach a strap into the built-in hooks of the JBL Xtreme 3. The sides are covered with rubber and the speaker is covered by thick net. It has IP67 rating as well. Build quality is very good. Sound Quality: Sony SRS-XB43 has 2 tweeters and 2 woofers to ensure clarity and punchier low ends. It has X-balanced driver that produces rich and pleasing sound. In case you enable the Live Sound Button, you can hear music at 3-dimensional space. The speaker has excellent clarity and good stereo separation. You can use it for listening to music, audio books and others. With an SPL of around 90dB, the speaker can produce room filling sound in large spaces. We don’t suggest pushing it to 100% volume as it might reveal artifacts. Playing bass heavy songs, you will hear clean and tight bass. It has good depth and produces warm sound along with good soundstage. Comparing Sony SRS-XB43 vs JBL Xtreme 3, the Xtreme 3 has a better soundstage and stereo playback. JBL Xtreme 3 has 4 drivers and 2 bass radiators. High ends are good, mids are balanced and bass is adequate. Although it can fill-up large rooms, it is best to not to push to max volume. Along with newbies, bass heads will be pleased with this speaker. Along with good separation, instrumental sounds are produced with accuracy and clarity. It delivers rich and detailed sound with good dynamics. Connectivity: Both these portable Bluetooth speakers have 3.5mm port and USB to charge smartphones. They can connect two devices at a time. While JBL Xtreme 3 has Bluetooth v 5.1, the Sony has 5.0 version. Additional Feature: The Sony XB43 model can give a playback of 24 hours and 14 hours if you enable the Extra Bass feature.  Basic physical controls are available on the speaker, but it is easy to use the Sony Music Center app. Use it to tweak EQ or change light color. The JBL Xtreme 3 has a battery lifetime of 15 hours that you can get from a charging time of 2.5 hours. Overall, it is best for outdoor parties. Which is the best? Comparing Sony SRS-XB43 vs JBL Xtreme 3, the Sony is available at lower cost making it a good choice for budget-friendly users. If you like the aesthetics of JBL with bottle opener and its broad soundstage, we suggest you to go for JBL Xtreme 3. Sony SRS-XB43 JBL Xtreme 3 Pros PartyConnect to pair max 100 speakers Hands-free call Flexible placement NFC   Cons Bulky Pros PartyBoost to pair other speakers Built-in bottle opener Lossless playback through aux   Cons No speakerphone     Best powerful: Sony SRS-XG500 vs JBL Boombox 2 [cmp]-772-748-[/cmp] Build Quality: Sony SRS-XG500 has an IP66 rating. It weighs around 6 kg, but the built-in handle makes it easy to carry. Build quality is solid and the speaker has a plastic body that is covered with clothe type grille. Circular light rings are seen around passive radiators. The weight and handle design are same for JBL Boombox 2. It has an IP67 rating and can easily be used outdoors. It has a plastic base and handle. Overall, the build quality is very good. Sound Quality: Sony XG500 sounds full and rich in terms of audio. High-efficient tweeters and radiators produces impactful sound that is enough to create party mood. Vocals and lead instruments are clear. With an SPL of greater than 95dB, it can get loud enough for outdoor parties or large rooms. ClearAudio+ and Mega Bass options to tweak the sound. JBL Boombox 2 Bluetooth speaker has a balanced sound profile. The speaker has broad soundstage. It can produce crisp and clear sound with punchier bass. Stereo playback makes this speaker easily handle movies and music. The speaker can get quite loud and deliver sound with clarity. Overall, the speaker can produce immersive sound field and gives satisfactory performance. Connectivity: Sony SRS-XG500 has a guitar/mic input and 3.5 mm port. With several connectivity options, it is one of the best versatile Sony Bluetooth speakers. JBL Boombox 2 only has a 3.5mm port. Additional Features: Sony XG5000 outdoor Bluetooth speaker has a battery life of 30 hours. With a 10min charge, it can run for 3 hours. Use the mobile app to adjust graphic EQ and presets. JBL also allows you to use the app and tweak sound with EQ options. It has a battery life of 24 hours. Which is the best? If you want a mic/guitar input, then Sony SRS-XG500 is best for you. On the other hand, if you want broad soundstage with good bass, JBL Boombox 2 is ideal for you. Sony SRS-XG500 JBL Boombox 2 Pros PartyConnect Very long battery life Sleek design   Cons No voice assistant Pros Good built Wide soundstage Can get loud   Cons Costly; Parting words: Comparing Sony vs JBL Bluetooth speaker, JBL can produce reliable sound with good bass. It might be costlier than Sony in some cases but wins in terms of aesthetics and color options. Since outdoor speakers are easy to show off, you will love multi color options. Sony tries to focus on features along with performance. Most of the Sony Bluetooth speakers support speakerphone which is missing in JBL models. They also show a longer battery life. One reason to choose Bluetooth speaker is their ease of user and simple controls. No matter which brand you choose, the cost is also reasonable. FAQ: What should I consider in a party speaker? A party speaker must be loud enough for crowds. In case you want to take it outdoors, make sure its portable and has high IP rating. Is Bluetooth a must have in a party speaker? While partying or using a speaker outdoors, wired connections are convenient. They might also get wet in rain. So, wireless Bluetooth is the best option.
-Read More
How to Reset Vizio TV Without Remote
HDTVs have become a lot more affordable over time, and they have also added a lot of new features, which can lead to problems later on, but this is not always the case. HDTVs have become a lot more affordable over time, and they have also added a lot of new features, which can lead to problems later on, but this is not always the case.  Vizio TVs are a popular choice for people who want HDTV for a low price. Many people like them. But they have their own set of problems, too. An easy way to fix many problems quickly is to do a "factory or hard reset." This can help with things like a frozen or unresponsive screen and other problems. Using the Vizio TV's own remote, you can turn it off and on again. There is no need to worry, though, if you really have lost your remote or it doesn't work. To help you with this guide, we'll show you a few ways to reset your Vizio TV without a remote. When you reset your Vizio TV to the manufacturer's default settings, all of your saved data, preferences, and configurations are lost, and you must re-configure the device from scratch. Ready to start? Let's get to it now. How To Reset Vizio TV Without Remote As with any other Smart TV on the market, the Vizio TV can have problems when it comes to fixing them. When electronic devices don't work right, the first thing to try to fix them is to reset them. Here are some reasons why you might want to reset your Vizio TV: This means that the TV is not responding to the things you say to it. The TV freezes or slows down. Suddenly, the apps won't work. No matter how many times you press the power button, your TV doesn't turn on. The TV shows a black screen all the time. It's hard to watch or listen to videos or music on the TV. If you bought or are giving away the TV, you must reset it to get rid of any stored data or information. This means that the device isn't connected to the web or WiFi. You don't know the TV's password and can't get to the home screen because you don't know it. Resetting the TV removes all the data that has been stored on it, putting it back to how it was when it was new. After you reset your phone, you will have to do all the settings and enter all of the information over again. If you don't have a remote for your Vizio TV, you can still set it back up. Instructions on how to reset your Vizio TV without a remote are provided below whether you have lost your remote. There are two ways to reset your Vizio TV: soft and hard. Read: How to Connect External Speakers to TV without Audio Output? Soft Reset The soft reset, also known as power cycling, removes the device's temporary memory and doesn't change the settings or apps that are already there. A soft reset is the best way to fix many unknown problems. This reset is easy to do and can be done in a minute or two. All you need to do is: Turn off the TV and press the power button. The power button will be on the back of the computer. Hold the button down for 30 seconds to a minute, but don't let go of it. Factory Reset Your Vizio TV will lose all of its data if you do a hard reset or factory reset. This means that all the data on the TV will be erased permanently. All of the settings and apps must be set up again after a hard reset. After a soft reset doesn't work, try this method only if the software problems don't get better. A factory reset is the last thing you can do. However, if you have malware, connection problems, video or audio distortion, or slow response times, you should keep going. If you lose your remote, the hard reset will be done by pressing the buttons on the TV set itself. Most Vizio TVs come with 4 to 5 buttons on the top, side, or back. Make sure you find these buttons and follow the rules below: Turn the TV on. Press and hold the "Input" and "Volume Down" buttons at the same time. Pause when a dialogue box is shown on the screen. To reset to the defaults, hold down the "Input" button for 10 seconds when the screen says that. "Memory is being cleaned up now," the screen will say. Allow the reset process to finish, then restart your device. If you want to hard reset your Vizio TV, you can follow these four steps. Read: How to Turn on Sony Soundbar without Remote How To Reset Vizio TV Without Remote: Other Suggestions Use the SmartCast App This is the SmartCast app for the Vizio TV. This version is great for having a home theater experience because it has a lot of streaming options as well as more advanced and smart options. If you have the Vizio SmartCast iOS or Android app, you can use it with the Vizio SmartCast app. You can use this app to reset your Vizio TV by following the steps below: There is an app called SmartCast that you can download and set up on your phone. It works with your Vizio SmartCast TV over WiFi. Then, open the app and look for the setting. Go into the system, reset, and then go to the admin area to change things back again. Take a look at the "restore TV to factory settings." To get to the reset process, keep going. In the SmartCast app, you were able to reset your Vizio TV without having to use the TV remote. Read: Polk Soundbar Keeps Turning Off Get a New Remote Control for Your Device There is no volume or input button on your TV, and the SmartCast app doesn't work with your TV. You'll need to buy a new remote. If you will not have a universal remote around the house, then you can't use it. Use the correct codes for your Vizio TV and your set. In certain cases, you can buy one from Vizio. Other online stores should have one that fits your Vizio TV model. As soon as you connect the remote, you can use this to navigate the settings menus and look for a way to reset the device to its factory settings. With Mi Remote Controller App If the buttons on your TV don't work or you can't reset your Vizio TV with these buttons, you can use a smartphone instead. Can you make a TV remote with your smartphone? If your phone has an infrared sensor, you can do this! Many phones have such an IR sensor that works like a real remote control. Make sure you have a universal remote app on your phone and then reset your Vizio TV. Another thing you need to do is make sure your TV and phone are connected to the same Wi-Fi. Follow the steps below. To get the Mi Remote Controller App on your smartphone, go to the PlayStore and look for the app. As soon as you get it, follow the on-screen instructions to connect it to your Vizio TV. In the app, click on the digital button. Then, go to the TV menu. This will show a lot of different settings and options. Reset and Admin are in the settings. Choose System and then "Reset and Admin." Select "Reset TV to Factory Defaults" as your next choice. If you need to enter a pin, do so. Then, finish the process. That's how you can get the Vizio TV back to how it was when it was new. It might start up again more than once. This means that you should not turn off the TV or press any button. You have to set up the smartphone remote controller app before you can use your phone as a TV remote. This means that you have to do this before you can use your phone as a remote for your Vizio TV. However, if you haven't set up the remote control app on your Vizio TV and not have a remote, this technique won't work for you, either. Unfortunately, you need to connect your Vizio TV to a control port in order to set up the remote app on your phone. In other words, if you have set up your smartphone app to work with your Vizio TV, this method is for you. Also, be careful if you use your smartphone to control your Vizio TV. Just after default restore, your remote smartphone app won't be able to connect to the Vizio TV. Not only that, but you won't be able to do anything with it. Read: How To Reset Blackweb Bluetooth Speaker Via the Back Panel Buttons Another way to reset a Vizio TV without a remote is to use the buttons on the back of the TV. To do this, follow the steps in the table below: Before you begin, check to see whether your Vizio TV has been switched on. Hold down both the Input and Volume Down keys at once. Once the message "To Reset to Default" displays, push the input button on the rear panel for 10 seconds. As the message says, you can let go of the two buttons. Presently, press and hold down the input button for 10 seconds, and then let go of the button. It will say "memory is being cleared" if the reset is done right. The screen will be reset soon. Soon, your Vizio TV would then turn off and start up again. This is what will happen when the TV is turned on: It will automatically set itself back to its factory default setting. Steps 3 and 4 are important in this method, so don't skip them. If you do, the reset will not work. When you get to step four, make sure you hold down the input button right after the notice from the previous step appears. If you don't get it the first time, don't worry. You can keep trying as long as you want to keep trying. In the event that none of the aforementioned methods work for you, don't be discouraged! It's possible to get help from the official Vizio support team. They'll show you how to fix things, especially if the back panel buttons don't work. What if the Vizio TV still won't restart without the remote? If the methods above didn't work to get your Vizio TV back to its default state, there isn't any other way to do so. There's no need to lose hope since you still have a few choices. By going to the official Vizio support team and telling them about your problem and what you've tried so far, you will be able to get help quickly. If the buttons on your rear panel aren't functioning, they might be able to help you figure out what's wrong. There is a physical button on the back panel of your Vizio TV that doesn't work. You can try to fix it yourself by giving it several hard pushes and getting rid of the dust around it. Check your warranty, and if it's available, take use of it in the event that you're unable to fix the problem. Another cheap way to use your Vizio TV without having to use the original remote is to buy a universal remote. Their prices start at $13.99, and a lot of people have said that they work well and are very responsive. In this case, you can't think a great performance, but we're sure it would get the job done. You should make sure that your Vizio TV can use a universal remote before you buy one. Conclusion  When you don't have the remote for your Vizio TV, setting it back up without it is very simple. There are some times when a power cycle will also solve your problems, but if you're still having problems, a factory reset is a positive idea to do. Sometimes when factory resetting the TV doesn't help, it's likely that the TV does have a hardware problem that won't be easy to fix on your own. I hope the suggestions in this post were helpful in resolving your Vizio TV issues. Frequently Asked Questions How do I factory reset my Vizio TV without remote? If you don't have a remote for your Vizio TV, turn it on. At the same time, hold down the input as well as volume down buttons for about 15 seconds, then let go of them. When it tells you to, press the input button for ten seconds. As soon as you do this, your TV will finish the hard reset and start up on its own. How do I force restart my Vizio TV? Here are the steps to force restart your Vizio TV. Then, turn off the power without unplugging it first, then turn it back on. Press and hold the CH+ and CH- buttons on the remote at the same time, then turn the TV on and off again. Press the power switch. Let go of the CH+ and CH- buttons. Press the Menu button. Then, a menu will appear on the screen. F will be shown on the bottom right corner. This means that this is a factory screen. Press the Menu button for a while to get to the Service Menu. You can see how to do a factory reset from here. How do I reset my TV to factory settings without a remote? Without a remote, you can follow these steps to make your TV work like it did when it came out of the box. Remove the TV power cord. Press and hold down both the Volume Down and Power buttons on the TV at the same time to turn the TV off and on. Plug the cord back in while you do this. When a green LED light appears, press the buttons and let go.
-Read More

ADVANCE COMPARE ENGINE

Select Two Audio / Video System for Detailed Comparison

ADVANCE SEARCH ENGINE

Find Your Sound System by Any Desire Specification